Pages

Tuesday, July 31, 2012

DIY Tuesday: Body Lookin' Like MILK!

When I was little, I always hated being in an outfit that matched perfectly. "That's too matchy-matchy!" I would tell my mom. The same idea resides in our home today. I don't want everything to look as if I just walked into a store and said "I'll take the whole set."

When decorating a house with a mid-century vibe, I wanted to also touch on some decor earlier to the MCM era. My theory is that if our house was really owned by someone in the 50s/60s, even while trying to embrace a more modern style, naturally they would already have some things that were dear to them. Antiques or heirlooms maybe. 

Our fireplace mantel is TALL. It is taller than I am. Our ceilings are not particularly tall either, so it leads to an odd height of space above the fireplace to the ceiling. I had to think of something to fill the space, but not be too tall. I spent a lot of time thinking about what to do with the space. We have a beautiful crochet piece that my great aunt made us for our wedding with our last name worked in. It is already framed in a shadowbox. That was my jumping off point. 

I really love old glass pieces, particularly milk glass:

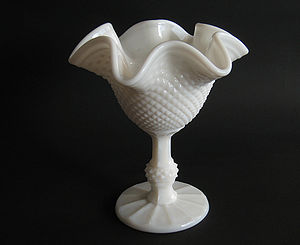
REAL milk glass is expensive and collectible. Not so much in the budget. Plus, I'm trying to go colorful in the living room. While internet dreaming, I saw this piece: 

I am in love with all things Tiffany blue-ish and I knew that I could recreate this look. 
Off to the goodwill I went! 

I grabbed a bunch of bumpy clear glass pieces in varying sizes and shapes. then I narrowed them down to the ones I wanted. Lots were 50% off, so I ended up getting them all for about $5. Not too shabby. I took them home, cleaned them, and painted then on the INSIDE only with light blue paint, making sure to cover completely. Arranged around the crochet piece, I love how they look. They are totally reminiscent of milk glass, for so so much cheaper. It ties into the history that I want to create for this house. They fill the space, but are not overwhelming. Perfect. 

Here's the finished product: 

And the whole picture: 

Monday, July 30, 2012

Inspiration Monday: "This couch, nice color!"

This inspiration post is all about our new, fantastic, daring, lovely couch and how it's inspiring the rest of the room. 


 It's from Macy's (I didn't know they made furniture until a while ago, did you?) and it's this one! We have been stalking it since the first week we moved here, and we finally pulled the trigger. We got it on a 10% off sale, with a $100 discount for opening a Macy's store card that we're just going to cancel anyways. Not too shabby if you ask me!


Here's what it looks like in the house: 


Heeeeeeeeeeeeeeeeeeeeeeeeeeeeey, Sexy Lady!!! 
Watch this video to feel how I feel when I look at our couch: 

I'm glad I found a way to work that into this post. 

Safe to say, we love it. It's hard to tell from that picture of course but it totally brightens up what once was a super dark, empty room. YAY for furniture! We love how it has a strong nod to the mid century style that we love so much without being something that will be dated in a few years. The color is not for everyone, but it is absolutely for us! 

When the delivery guys brought it in, he told us he liked the color. I know he probably says that to everyone, but a girl can pretend, right? 

Already, I'm really digging the yellow on the canvas art behind it and how it ties into the couch. The bookshelf was a garage sale steal, totally MCM (Mid Century Modern) and from a couple that was going into a nursing home together. They had for a long time and loved it, and I will do the same. Here's a better view of how that's accessorized: 

Across from the couch is our old light grey ikea ottoman that matches the couch in the den. I wanted to break up the matchy-matchy-ness of the house, so the old couch now has a huge dark grey felt ottoman that I made out of a thrifted table. 

Here's a dark shot from the end of the space (admittedly, I closed the heavy drapes so I wouldn't be shooting into light.)

You can see the ottoman and the bentwood chair I picked up at Goodwill outlet. Yes, outlet. That's going to be getting a new cushion shortly. 

My biggest dilemma right now is a rug. We need  a rug in this space, and rugs are soooooo expensive. The only thing I know for sure is that I don't want to shy away from color in this space even though we have a bright couch. I think the right colorful rug could add a ton of awesome funky-ness to the space. 

Now first to the dream rugs (out of my price range but beautiful none the less):

The anthro ones won't let me grab pics, so you're gonna have to click. Sorry! 


This one above is the ULTIMATE. I've been thinking about getting a cheap plain white rug and painting it to match this. There are plenty of tutorials on the internet about painting rugs, check it out if you don't believe me! 


  I like this one too, but it's a little grey for the space. Grey is great, but too much grey is dangerous! 


Here's some more affordable, pre-made options from Urban Outfitters. 

Blast, Urban Outfitters won't let me grab pictures either, I'll have to figure out how to get around that. In the meantime, here you go! 


My favorites are def the last two. Some of them we might have to buy multiples of to get the size we want and put them on a nice grip-y rug pad, but that's ok with us! 

We will probably end up with a diy project or a cheaper option. Some rug prices are just ridiculous! I mean, I walk on you! 

I will keep you posted on what we decide, but in the meantime I hope that this post helped you with some rug inspiration of your own!  

Friday, July 27, 2012

Adventure Time Friday: Don't go making phoney calls...

News Flash: The Pacific Northwest is wet. Wet, I tell ya! 


The hike we went (Elowah Falls) on is only a little over a mile each way, but it has the best payoff of almost any hike that I've ever been on. It's about 45 minutes east of our house, in the Columbia River Gorge area. Super beautiful. 


I used to think, eh, waterfalls, no big deal. When we rounded the bend and saw the waterfall, my heart stopped. I'm not sure what is all at once so soothing yet exciting about rapidly falling water. We both took turns getting as close to the waterfall as possible, getting soaked in the process. Oregon feels prehistoric to me, with the huge ferns, GIANT slugs, and huge leafy tree cover. I love the feeling I get when I'm underneath the trees. I know this is a short post, but I'll let the pictures speak for themselves. See ya on Monday!


Thursday, July 26, 2012

Booze Thursday: It's the end of the world as we know it...


 Yesterday the husband and I took a trip to our favorite beer acquisition spot:  John's Market. The website says that they have Portland's best beer selection. I have zero doubt that the statement is 100% true. ZERO DOUBT. The first time we went here, we spent like two hours looking at the beer. Drool time ensued. They have lots of Colorado beer too, which is great when we wan't something that we already know and like. When we do want to be adventurous, there's A TON to choose from.


Here's some pics from the last time we were there: 


And those were just a couple breweries that we were excited to see there. There are literally about ten million more aisles to explore. Yes, I just said literally. 


Before I get into the actual beer that we drank, I need to provide some background on my love affair with elderflower. I have a serious St. Germain addiction. (Don't know what that is? Go buy a bottle then mix a shot of it with soda water and lime....NOW.) I also have an itch to hoard multiple bottles of IKEA's elderflower concentrate. Thankfully my husband only lets me keep one bottle at a time.Thus, the reasons why I chose the following beer should now be obvious. 


Yesterday I picked up a bottle of Elysian Wasteland Elderflower Saison. This beer is part of a series dubbed "The 12 Beers of the Apocalypse." This is entry six. The bottle asks "If the end of the world was upon us, which beer would you brew?"  This one. Yes, this one. 

 Please note the glass that the hubby poured it into...Dead Guy Days. Thanks SIL!


I love saison and I feel that saison appreciation is on the rise. Yay! Saison was originally a farmer's beer. The french farmers that brewed the ale would each put their own spin on the beer that they brewed, therefore the style as a whole is hard to describe accurately.


 I can speak that this specific beer was crisp and light, with a distinct flowery nose and crisp hop finish. It would be super refreshing after a hot day farming my fields in France. The elderflower was present, yet not overwhelming, which would have been a disappointment. As much as I like elderflower, I also like a balanced beer. Bottom line: you should immediately head to John's Market (Or Wilbur's for you foco peeps) and grab a bottle. I think it was around $8, which is a fair price for such a great beer. 

Wednesday, July 25, 2012

Wednesday: Let's go to bread sticks!


Have you ever made your own marinara? I do all the time. It's cheaper, easy, and I am under the impression that anytime that I make something from scratch it's bound to be far better for me. Today I am going to share with you my recipe for homemade pasta sauce, as well as my recipe for easy, ugly bread sticks. Let's go! 


First up: Marinara
Assemble ingredients: 


2 large (28 oz) cans of crushed tomatoes
1 small can (6 oz) of tomato paste
4 tbsp balsamic vinegar
1/4 cup brown sugar
5 bay leaves
5 cloves of garlic, smashed
1 medium onion, minced
1 tbsp dried oregano
1 tbsp dried basil
salt  and pepper to taste


Dump all ingredients into a crock pot on high. This is the secret to great tasting sauce with a deep flavor. The sauce simmers all day without any stirring or effort on your part. The edges caramelize and just make it so so yummy. 


When your 6-8 hours are done, serve! Remember to dig out the bay leaves. I will admit that I usually leave them in there and we grab them out when we eat. Shame on me.  I usually freeze a good portion of this sauce, so I end up only having to make the whole recipe about every third time I make spaghetti. 


See how it looks burnt around the outside? It's not burnt. That's called FLAVOR! 


Now on to the easy, ugly bread sticks. You will understand why I call them that shortly. 


Preheat your oven to 450 degrees. 


Mix dry ingredients in a medium size bowl: 
1 1/4 cups all purpose flour
2 tsp sugar*
1 1/2 tps baking powder
1/2 tsp garlic salt 


Gradually add 2/3 cups milk of your choice to the dry ingredients. Mix to combine. You should have a fairly sticky dough-like substance. 


* I use a coconut milk substitute in my house that is like soy milk, but made from coconuts. I find this to be a little sweeter, so I usually omit the sugar. There's no yeast that needs it to feed on, so no harm done. 


Turn the dough out of the bowl onto a well floured surface. Pat out into a rectangle-ish shape. Use your judgement on how big to make it. You have to cut 12 bread sticks out of it. They do not have to be pretty, hence the name of the recipe! This step is just to make 12 equal portions of dough. 


Cut your bread sticks out of the rectangle. Grab a 9x13" baking dish. Melt 3tbsp butter and pour into the dish. Now we're talkin! 


Grab your first bread stick. Fold, stretch or otherwise abuse your dough to make a bread stick that is about 5 inches long and 1 inch high. Throw it in the pan and turn over so the butter is on both sides. Repeat  x11 until all the bread sticks are in the pan. Looking ugly? Good. 


Throw 'em in the oven for 14-18 minutes or until lightly browned. Enjoy! 

Tuesday, July 24, 2012

DIY Tuesday: Blue Tape Strikes Again

COMPANY IS COMING! Two of our friends are visiting soon, and I am all in a tizzy getting our house in order. I finally got the master bedroom all set (we have been sleeping in the guest bedroom until we could get a new mattress and bed) so that's a huge win. 

The guest room looks pretty good, but the only problem is the HUGE blank wall across from the bed. It's seriously like looking into a light blue abyss whenever you sleep in there. Here's the view from the edge of the bed: 


Disclaimer: I can't find batteries in our still somewhat crazy house to replace the batteries in my camera, so cell phone it is! Expect picture quality to increase soon. 

I've been going for a travel-y (totally a word) look in this room. Here's a shot of the night stand accessories.

 IMAG0494.jpg

See, Buddha + our limited travel book selection = travel guest room   TA-DA!! 

So, an idea (with the help of Pinterest...who would of thunk it?) was born. 

Website linked that provides all the states to be downloaded and printed!

I saw this lovely pin and reflected on how many states that the husband and I have some connection to. 
Yes, I think this could work.
The pin link leads to a .gov website that has all the US maps ready to print. 

I'm slowly sneaking some typography into our house (It's not the husband's fave thing but done right I luuuurve it), so I wanted to pair the maps with a saying. I'm not into the coordinating Live-Laugh-Love accessories. We're a bit more fun-kay than that. 

Right away, I thought of this song: 
Amazing song. 'Nuf said. 

So, I typed up my (and probably a million other people's) favorite line from the song with my favorite font. I bet you can't guess what the line is going to be! 

I printed off the maps and the saying, then got cutting. Here's a progress shot: 


Once I got everything cut out, I taped on hearts that I printed and cut onto the towns that are relevant to us. Then I secured the whole thing to the wall with blue painters tape (a renter's best friend!). 

Here's the final product: 


Can I hear a womp, womp, womp? 
What was supposed to fill up and enhance a wall just ended up blending in. 
Do not panic! 

First, I thought that I would hang up a panel of fabric and put the maps and words on top. I grabbed this fabric: 


Hello Travel! I will spare you what it looked like on the wall because it was just awful.
 I knew that the color would wash out too. Not an improvement at all. 

Round 2: I pulled out some felt sheets (I have like a million) and put the maps on that. 


Dear old Wyoming looked a lot better with a dark frame around it. But, I didn't have enough brown felt! I wanted this project to cost exactly zero dollars and zero cents. Plus, I severely doubted the sticking ability of my trusty blue tape on the felt. 

They say third time's the charm, and that was true here. I remembered a stack of kraft colored paper left over from my wedding. It was great. The tape stuck and I had more than enough. Here's dear old Wyoming again: 


Much better! I went for it. 
After much sticking, unsticking, and more sticking, I was left with this: 


Love. It looks better in person (what doesn't?) as you can really see the scale that mirrors the bed and headboard across the room. I think that our guests will feel loved sleeping across from this art. The best part is you can re-arrange, add states, or rip it all down whenever you want! I'm still working on getting some of the letters to lay right. Nothing some fiddling won't take care of. 

Does it make you want to come visit? Good! 

Monday, July 23, 2012

Inspiration Monday: Turkey Talk

So with the awesome reality that I will have a packed house full of family and friends for Thanksgiving, I  don't think that my well loved and carefully restored pedestal table will cut it. Right now I count ten people....TEN!!! My pedestal table seats 4. 
In case you can't math, 10-4=6. I. need. a. bigger. table. 


Thanksgiving feels far away now, but I know your sneaky tricks Mr. Calendar. 


Anywho, I can't find a table that I like for any kind of reasonable price. I'm picky, and making a table is the best way to get what I want. If I don't like it, I can only blame myself. Perfect. So, naturally I turned to pinterest to see what was up. 


This is what was up: 


dining table diy
Drool....I love hairpin legs like these ones, and I have been wanting to use them forever.

DIY dining table!  I will be making this for Thanksgiving!
I like the legs on this one as well, not so much with the driftwood look on top. Bonus: Legs are from Ikea!


I pitched the idea to the husband and he said we should roll with it. All of the tutorials online say that it basically involves cutting planks to desired size and attaching them from below with a small cross-plank and screws. If that doesn't make sense, I will post pictures as we make it and you'll get the whole story. It's not going to be THAT easy, of course, but gosh darn-it we will make it happen! 

Husband also pitched the idea that we could include a leaf by buying the sliders for it and making a leaf to match the table. I'm still super intimidated by this idea, but I'm not crossing it off yet! 


Saturday, July 21, 2012

Numero Uno

Disclaimer: I can't guarantee that I will write anything that you will actually want to read. Proceed at your own risk. Oooooh, scary!


So with the assumption that family/friends would like to hear a bit about our adventures in Portland, (and the need for me to have a creative outlet/time sucker) I present my humble blog.


This is what will be the daily plan:
M: Inspiration Monday--Think fun Pinterest projects, home decor inspiration photos, and DIY inspiration for the upcoming week.
T: DIY Tuesday--I will share a DIY project because, well...I like to do that stuff. And this is my blog!
W: Good Eats Wednesday--A new recipe to share that I have actually tried. Wow.
Th: Booze Thursday--Because....yeah. Exploring the massive beer selection here.
F: Adventure Time Friday--Blow by blow of some new thing that we did in Portland.


Peace, Sheridan